Boot Cut Custom Pattern

I have been working hard trying to get this pattern perfected from my sloper. I did a post on this here and used this book to draft a pattern.

DSC_3863DSC_3889


Here are a few pics of my fitting stage, these are basted up with my dissolving thread that I can just iron out instead of unpicking!

DSC_3916 DSC_3915 DSC_3913

So initially I wanted the waist band to finish at the waist but look like a low-rise …in the end it just looks like a normal waist band lol. Not sure how to construct a waist band,  I did my best and thought it didn’t turn out so bad. I added twill tape to make sure the waist does not stretch. I also interfaced the areas where the button and buttonhole will go for added sturdiness.

DSC_3943 DSC_3944

I designed these pockets by taking a wax paper impression of pockets from a favorite pair of jeans I have.  I blogged about that here.

DSC_3939

I made these pockets extend all the way to the center front so that gives them some “tummy tuckin’ strength”  I used a pretty white swirly print cotton for the pocket lining.

DSC_3903DSC_3897

I used a metal zip so it is nice and sturdy to go along with the tummy tuck pockets that will surely keep all my jelly donuts in place. The fly zip went in beautifully and I could not have had an easier time with that thanks to the craftsy course I just completed on pants. Check out that course here.

DSC_3945

I wanted to do minimal topstitching so the pants had a semi dressy appearance to them. I used jean topstitching thread and a stitch length of 4.0.  completed with doing a blind hem. Again I love to hem them super long so with my everyday shoes they are just barely off the floor. Hoping it gives the illusion of lengthier legs.

Initially during construction I was going to attach the outer legs first and top stitch them in some pretty decorative stitch…..but I chickened out! Wasn’t sure if this would look good with a boot cut? Maybe it would have just looked cheesy lol.  In the end I did nothing creative and just topstitched the inner leg seam.

DSC_3941

I love this button I found for these pants!!

DSC_3946

These final pictures I decided to wear these pretty high heel beige sandals and it turns out there is way too much of a heel for the length I made these pants. So after boasting about how nice and long they are …..I’m wearing floods!! My go to pair of comfy shoes do look great with the length of these pants. I should have looked in the mirror first before I got my hubby to snap the photos!

DSC_3951 DSC_3949 DSC_3950 DSC_3952 DSC_3956

So what do you guys think? Do they look wonky because it is my own pattern or do they look like normal pants?

I must say they are super comfortable and have become my new favorite pants!!!

My next course I started is making your own bodice pattern. Yes it is yet another Craftsy course!! I hope it is as successful as my pant sloper.

I did try to graph out the bodice sloper from the book I have: How to make sewing patterns.

I must have done something wrong though, because the pattern even looked wonky. When I cut out the muslin and tried a pin fitting, well…….lets just say it had me in stitches(I know what a groaner of a joke) hardy har har!! (to embarrassed to even show you a pic) So maybe I will get a more visual idea of what I am doing with this course!

I am in love with the drafting process of making a pattern! I find it as much fun as sewing!! So as I mentioned before if anyone wants to send me measurements for me to construct a pant sloper for you with your exact measurements you can email me at nicole.grigor@gmail.com and I will let you know what measurements I need. I will do it free of charge of course I am no expert and I just want to practice and get better at doing this. You may fall in love with this book as I have 🙂

Happy Sewing

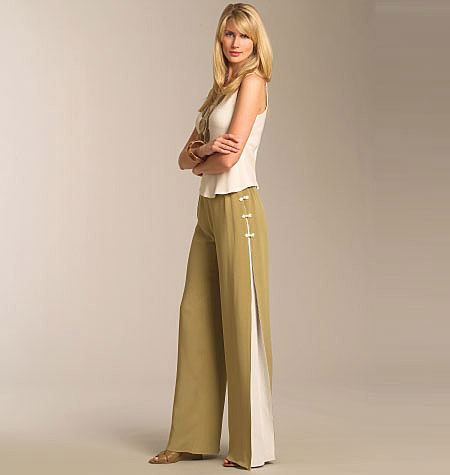
Vogue 1050 complete

DSC_3928

I had very high hopes for these pants but my end result was far from good. I will share my failures with you because I need to bitch to someone about my plight  I think we all learn something everytime we pull a chair up to our sewing machine.

Cons:

  • I hate the fabric I chose, it is a cheap polyester and I thought the drape would be nice and the fact that they shouldn’t wrinkle very much.  In the end the sheen it has screams cheap 😦  The drape is quite stiff and does not hold any sort of crease, which of course is uber important for the large pleat at the side seam.
  • The invisible zipper was a bitch to put in for some reason.  I don’t usually have such hardships with zippers but its obvious a weakness for me and I need to practice. There is a slight bubble or weirdness to the back center where the zipper is…..maybe I will wear a long coat with these pants lol
  • The waist band turned out a little wonky and in hindsight I should have had the zip go all the way up to the top of the waist band.  I have a hook and eye closure at the top, but this left a gap that is pretty unsightly.
  • The fabric does not hold a crease well, and the large pleats on the side seam doesn’t fall as nicely as I would have hoped.

Pros:

  • I do love this pattern. I think now that I have made a sloper for myself (another post about that soon) I will use these design features and try these pants again with appropriate fabric.
  • hmmmm that’s all I got I loved wasting 15-20 hours on these pair of “what the heck are you wearing” pair of pants it was good experience and practice…..lol

I finally bought the frog closures. It was hard to find a color I felt would go with the grey and black. I was trying to find a silver or grey of some sort. There aren’t many choices at my local craft store so I just got black. Let me just say I hate hand sewing and applying all these frogs by hand was time consuming and tedious!

DSC_3928

Again I tried to hem these as long as possible.

DSC_3927 DSC_3930

If I am brave enough to wear these in public I think this pattern and fabric will look really cute with these pants. The peplum top will cover the waistband. This was another craftsy steal at $12.94 for the material and pattern! I was going to get the link for you guys but it seems they have sold out of this kit.

DSC_3947

Sewing Tips and Tidbits

DSC_3888

I bought some of this thread on Amazon.com

The latest course I am taking introduced this product to me and I never knew it existed!!

Why would you want your stitches to dissolve you ask……BASTING!! Brilliant right!

You use this thread in your bobbin and needle for basting up your muslin.  Does anyone out there make the perfect first muslin that you don’t need to unpick? I say NO!   If you do, PLEASE tell me your secret! When you need to get rid of the basting stitches take your iron and plenty of steam and iron them away. This thread will only work with material that you can use steam on. You can always do a test on a piece of scrap 🙂

I can’t wait to try this product out! I am working on a new muslin now with the design elements I chose.  I decided on a faux low rise waistband with fly front, pockets and a boot cut fit.

Here is my new pattern sloper taken from my block pattern and altered from hip to hem for leg design.

DSC_3889

I copied the front pocket design from a pair of my jeans using wax paper.  Another great trick I learned from this course. You just take your finger nail and scrape center front, side seam, waist seam and your pocket. Then trace over in a sharpie and apply to your sloper!

DSC_3878

You can use this to trace any sort of design from RTW.  I may start bringing rolls of wax paper with me when I try on clothes at the store  😉

One more tip. I wish I would have known this tip when I took Angela Wolf’s class on making jeans. If you don’t have a template for the fly use a spool of thread to get the curve of the fly. In my case you can also use it too get the curve of the fly front during the drafting stage.

DSC_3879

Happy Sewing!

Constructing Vogue 1050

V1050

I have been working on this pattern the last few days and I want to share my experience with you.

After the tissue fitting and cutting out the fashion fabric, I basted it together to check the fit. Here are some pics of that. Some of the drag lines I have are simply because of my hem dragging on my feet and the floor.

I am pretty happy with the fit. As you can see I chalked my seam lines.

DSC_3745 DSC_3746DSC_3744

I recently found out that traditional measuring tapes have an exact width of 5/8 ” How did I not know this??? This makes it so easy to chalk my seam allowance and get rid of the “fit insurance”(AKA bat wings from my previous post). For those of you that might not know this, fit insurance is when you give yourself an extra 1″ on the side seams (total of 1  5/8”)  seam allowance incase you need some extra material during the fitting process.

DSC_3754

Ok so my next task was to work on the wide pleats for the side seam.  Sandra Betzina recommended a zig zag stitch to help with the drape….hmm didn’t see the point of that so I did not heed to the warning and sewed this up like I normally would.

The fabric I am using has a sheen to it and very slippery during constructing these pleats. I used “the trim” (more on that later) and tried to initially based them together 4 thicknesses together slipping and sliding AHHHHH! I stopped and went to get myself some double-sided sticky tape for basting (also recommended in this pattern!)

DSC_3747 DSC_3750

Notice I used the double-sided sticky tape through all thickness of the trim and the pleat!

Here is a good picture of the difference the tape and the zigzag stitch made. My settings were 1.0 and a length of 2.5.

DSC_3755

Post correction pleats are all basted together with no puckers. Huge difference it lies completely flat!

DSC_3752

I chalked my guidelines where my folds will be:

DSC_3753

Here is the panels inserted between the front and back sections:

DSC_3758 DSC_3760

I must stop and tell you this important tip about this pattern. It has the pleat section as well as “TRIM” pieces. If you want the trim to show all the way up to the waist band then by all means use those pieces. If you want the pleat to disappear at the hip where the frog closures will go (as in the picture on the front of the pattern) then DON’T use the TRIM.

I made this mistake and everything is serged together already so guess what….yup I am sticking to the trim 🙂 It actually looks nice and gives you the illusion of longer legs. I’m short so that works for me!!

Here is my fitting with the pleats (AKA vents) in:

DSC_3762 DSC_3764 DSC_3766

I am quite happy with the fit but I will have to add some darts front and back because it is still quite loose at the waist. I did not want to fool too much with the side seams because they need to be fairly straight for the design element of the pleats.

My next step is to put my darts in place, attach my invisible zip and then try them on again to see if the waist area fits better.

My fashion fabric does not hold a crease well and I may have to go in and do a small stitch on the fold of the pleats to hold its shape better.