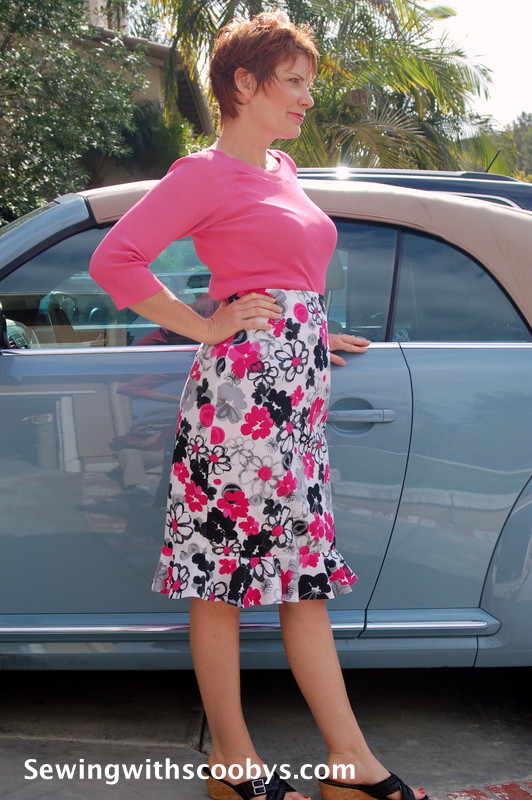
The Abby A-Line Skirt

I use to love using contrasting colors and different fabrics to construct clothes for my daughter Abby and being like a kid myself I thought this design element would be a bit fun to bring into adult clothes.

Thus the Abby A-line skirt it is 🙂

I used a fun cotton for the pocket facings too because I’m such a kid:

DSC_4254

The pocket backs are black as well as the band on the bottom of the skirt and unfilled piping along the waist band:

DSC_4206 DSC_4208

I lined this skirt with aqua to pick up the blue on the print of the skirt. Plus its my favorite color. My favorite thing to do is bring out the color I love about the fabric and use this in my serger as well!

DSC_4211DSC_4202DSC_4213

Before committing to the side seams I baste first and try it on just in case it needs some tweaking:

DSC_4203 DSC_4204

I put in an invisible zip and I think I finally have this zipper thing down! I am going to make a tutorial on invisible zips soon.

DSC_4193 DSC_4194

There will be no raw edges showing, I will be hand sewing the waist band in place, as well as around the zip, and the bottom of the band. I usually hate hand sewing but when I did my pencil skirt with hand finishing touches it was kind of relaxing and enjoying. Wow did I just say that?

I love the lining in these skirts, it hangs better and feels fantastic!

DSC_4214

And here is the skirt completed!! Yay, I spent 3 hours in total hand sewing and finishing touches AKA: button 🙂

DSC_4217 DSC_4218

DSC_4221 DSC_4225

and again I think a dark neutral top looks best with a busy print:

DSC_4231 DSC_4232 DSC_4235 DSC_4236 DSC_4237 DSC_4243


Pencil Skirt with Flounce (custom made by me)!!

DSC_4152

I have oodles and oodles of pictures to share with you!! I am so excited about how this skirt turned out! Thank you CRAFTSY and your drafting courses!!

Ok so I drafted a high-waisted pencil skirt, with a flounce and facing. It was so nice to cut into REAL fabric for a change and not MUSLIN!

Here is the skirt shell: Check out my darts, no bubbles on the vanishing point of the darts! YAY! These courses will make you really good at darts and confident with your construction.

DSC_4129DSC_4126

The invisible zip went in surprisingly well. I don’t know why but zippers always make me nervous and are usually a bitch to put in!  I interfaced this area with fusible interfacing.

DSC_4125DSC_4128DSC_4127

I basted the side seams and tried it on, it was perfect so I went ahead and sewed it for real. I also serged the edges to get a clean look.

I prepared my flounces and facing:

DSC_4123 DSC_4124

I cut out my lining and pleated the dart areas. I serged it and pressed it ready for applying the facing:

DSC_4122DSC_4131 DSC_4132DSC_4134

The facing got sewed onto the skirt, everything matched up very well. I edged stitch along the facing so that it would stay put better. The lining is folded up a 1/4 inch twice for a clean finish:

DSC_4135DSC_4136DSC_4138DSC_4133

Now comes the flounces:

I prepped these by stabilizing the inner circle by stitching both the material and the lining. I stitched them together along the outer edge with a 1/4 inch seam allowance. I took my time to clip the lining and fashion fabric, staggering the clips so that when they are turned they will fan out nicely with no “gaposis”

DSC_4142 DSC_4139 DSC_4140

It’s a bitch to do but if you open up the seams first on a pressing hem before turning you will get a nice finished smooth look.  A clapper helps with that too 🙂

DSC_4141DSC_4143

I attached the flounce to the skirt then clipped gently into the lining to help turn under to sew in place.

DSC_4146

I was so excited to finish this skirt I hand sewed the lining around the zipper and the whole lining of the flounce in place all in one night doing the tiniest slip stitches. It took 3 hours! Ta da!!

DSC_4147

Close up of flounce…..

DSC_4148

Lining near the zip…

DSC_4149

Inside out, upside down, sunny side up!!!!!! I know, I know, I have a ton of pictures.  Can you tell I am excited or what??!! ;)…..

DSC_4150

and another close up for giggles…

DSC_4151

Ok here are some pics of me wearing it so you can actually see the fit 🙂 I have a major hole in my wardrobe to find a top that will go with this high-waisted style but what I had wasn’t too horrible.

DSC_4152 DSC_4153 DSC_4154 DSC_4155 DSC_4156 DSC_4157

Faux Fur Vests

I have been finished this project for a while now but haven’t had a chance to blog about it! My kids have been off school for a week for Thanksgiving.

Ok I took a vest pattern I had lying around and tissue fitted it on my mannequin. I also changed the design from a princess seam to one flat panel.

DSC_3315DSC_3317 DSC_3316 DSC_3321

I made a muslin and tweaked some alterations. Turns out I need a sway back adjustment and that took care of the horizontal wrinkles I was having.

DSC_3322

I lined my faux fur with some satin fabric and sewed it all the way around leaving two areas open for turning. I pressed it carefully low setting, no steam  with a pressing cloth and hand stitched the openings shut.

DSC_3326 DSC_3327

DSC_3320

I also made one for my daughter Abby so we can be twinky twins.

DSC_3396 DSC_3397

DSC_3383DSC_3384


A Vintage Look

I thought I would share with you guys what I am working on right now. This is Laura Nash’s pattern from SewChic. The Tia dress: vintage, flirty and fun!

front_1312 tia_1

I have completed the bodice and will be working on the skirt portion of the dress today.

DSC_3027 DSC_3028 DSC_3031


I will be making bias trim and using bias on the armholes instead of sleeves. This top portion is fully lined and will have a zip on the left side that extends down into the skirt portion.

Happy Sewing 🙂

Linen Jacket with Flounces

I have been working on the linen jacket that matches the skirt I made. You can see the skirt post here.


I love the way it turned out. I like girly feminine stuff and the flounces on the jacket are so fun, they match the skirt flounce in the back.

The construction of this jacket seemed to take forever I originally wanted to put just the bemberg lining into it but the material is so heavy around the neckline that just the flimsy rayon would not hold the collar in firm place without the interfaced linen facings.

So I thought what the hell, I what the jacket to be smokin’ hot on the inside as well!…… so I put both inside:

DSC_2974DSC_2971 DSC_2970

I under stitched the peplum flaps, and all along the ruffle to ensure this bad girl behaved herself and not flash to the outside lol. . I hand stitched the bottom of the lining along the peplum seam line. I didn’t want any raw edges so I choose the same polka dot fabric I used as a facing for my skirt band and made bias tape. I used the bias tape for a Hong Kong finish.

The biggest issue I had was cutting the fabric flounces …….4 pieces completely identical……..  and sewing them as equally careful…….. so they were mirror images of one another.

Should be a piece of cake right?

Well lets just say this project is challenging and there was no “scooby snack drinking”  going on while I made this.

I quickly realized they were wonky when I pinned them to the front panels of the jacket.  Check this out:


IMG_0199

way off eh? Damn these got scrapped!

I then pinned the hell out of them and cut out 2 pieces at a time using scissors instead of my rotary cutter which I think was moving the fabric around a little too much on that dreaded bias.

Much better:

IMG_0201


A good tip is to also sew each flounce in the same direction this will make a huge difference in getting them to be on the same curve.

I  compared the two flounces to see if I needed to re-sew any curvy areas to get them as perfect as I could 🙂 To get nice clean edges  I trimmed my allowances, clipped my corners and curves. I pressed them flat first, then opened up the seams before turning on my wooden pressing tool.

IMG_0202 IMG_0203

After turning them I ironed them again and got a very nice smooth curve.  What do you think?  It’s as good as it gets because I am not making another set of these lol !

IMG_0209DSC_2972DSC_2973

All in all I did do some alterations, I didn’t want it too tight and overfitted  but now looking back I wish I would have taken a bit more out from under the arms and shorten the back to waist seam line. I still like it and I learned a lot from making my first jacket. Here are a few more pictures my hubby took for me.

DSC_2989

DSC_2990 DSC_2991 DSC_2992

What do you think? Have you ever made jackets before and if so what advice do you have for the next one I make? I really need a sewing buddy that can help me with alterations on myself if I could have seen the back better and pinned out some of that fabric it would have looked nicer.

Thanks for reading and have a great weekend 🙂