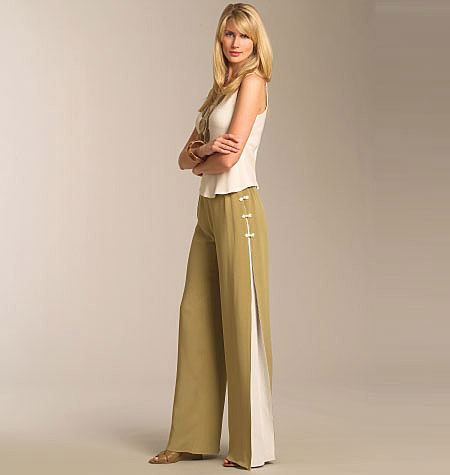
Pants Progress

Here are a few pics of me wearing the Vogue 1050.  I finished the waistband and invisible zip. It was a bitch to put in the zipper. I don’t know why but invisible zips and me don’t get along.

I just have to hem them.(hence the drag lines in the back….once hemmed they will look so much better)  Lucky for me, my parents are visiting soon and I will get my mom to help me with marking the hem.

DSC_3800 DSC_3801 DSC_3804

Now I still need to close the sides with some frog closures there is way too much of the panel showing but they are very comfortable to wear.

I must admit I am good at starting projects but procrastinate at the parts I hate ….(invisible zippers and waistbands).  I will look for some pretty closures for these pants for the side pleat, add my hem and voila! So close to being done!!

Happy New Years!!


Constructing Vogue 1050

V1050

I have been working on this pattern the last few days and I want to share my experience with you.

After the tissue fitting and cutting out the fashion fabric, I basted it together to check the fit. Here are some pics of that. Some of the drag lines I have are simply because of my hem dragging on my feet and the floor.

I am pretty happy with the fit. As you can see I chalked my seam lines.

DSC_3745 DSC_3746DSC_3744

I recently found out that traditional measuring tapes have an exact width of 5/8 ” How did I not know this??? This makes it so easy to chalk my seam allowance and get rid of the “fit insurance”(AKA bat wings from my previous post). For those of you that might not know this, fit insurance is when you give yourself an extra 1″ on the side seams (total of 1  5/8”)  seam allowance incase you need some extra material during the fitting process.

DSC_3754

Ok so my next task was to work on the wide pleats for the side seam.  Sandra Betzina recommended a zig zag stitch to help with the drape….hmm didn’t see the point of that so I did not heed to the warning and sewed this up like I normally would.

The fabric I am using has a sheen to it and very slippery during constructing these pleats. I used “the trim” (more on that later) and tried to initially based them together 4 thicknesses together slipping and sliding AHHHHH! I stopped and went to get myself some double-sided sticky tape for basting (also recommended in this pattern!)

DSC_3747 DSC_3750

Notice I used the double-sided sticky tape through all thickness of the trim and the pleat!

Here is a good picture of the difference the tape and the zigzag stitch made. My settings were 1.0 and a length of 2.5.

DSC_3755

Post correction pleats are all basted together with no puckers. Huge difference it lies completely flat!

DSC_3752

I chalked my guidelines where my folds will be:

DSC_3753

Here is the panels inserted between the front and back sections:

DSC_3758 DSC_3760

I must stop and tell you this important tip about this pattern. It has the pleat section as well as “TRIM” pieces. If you want the trim to show all the way up to the waist band then by all means use those pieces. If you want the pleat to disappear at the hip where the frog closures will go (as in the picture on the front of the pattern) then DON’T use the TRIM.

I made this mistake and everything is serged together already so guess what….yup I am sticking to the trim 🙂 It actually looks nice and gives you the illusion of longer legs. I’m short so that works for me!!

Here is my fitting with the pleats (AKA vents) in:

DSC_3762 DSC_3764 DSC_3766

I am quite happy with the fit but I will have to add some darts front and back because it is still quite loose at the waist. I did not want to fool too much with the side seams because they need to be fairly straight for the design element of the pleats.

My next step is to put my darts in place, attach my invisible zip and then try them on again to see if the waist area fits better.

My fashion fabric does not hold a crease well and I may have to go in and do a small stitch on the fold of the pleats to hold its shape better.


Vented Pants

I love this Vogue pattern. 1050

DSC_3656

See the cool inner panel??  How rad is that? I started to work on these the last few days. I just have some regular gabardine in black and animal print grey for the pleat. If anyone knows where I can get some pretty silver frog closures for the pants let me know.  I traced off my pattern and did some alterations.

DSC_3650

On the front of the pants I cut from the crotch to the hem and spread it about an inch tapering to nothing at the hem to compensate for my “thunder thighs”.  I am also meatier around the hips so I added extra ease as well as 1″ fit insurance.

DSC_3652


I love love love the Palmer & Pletsch way to alter. I pinned my front and back piece together and tried them on with my elastic at the waist. I have to also compensate for my “belly and butt” by adding more to the front and back waist section tapering to nothing at the side seams.

DSC_3653

After trying it on again I was very satisfied with the fit of the tissue paper. I then cut out my fashion fabric and pin fitted that as well.

DSC_3659

After trying these on (and playing Chinese torture with the pins I thought “screw that bullshit”) I decided to baste them with my machine. I have a basting length of 20mm and it worked out perfect, functioning just like the pins….. minus the torture….. and much, much faster. Win, win for me!!

DSC_3669

I know they look like bat pants! I’m going base jumping later with these bad girls… lol I have an extra 1″ fit insurance on the side seams. Hence my winged pants.

DSC_3668

I made a few alterations. Chalked my seam lines, removed the fit insurance and now I have to work on the inner panels(pleats) of the pants.

More to come….

What method do you use to alter your patterns? Has anyone tried the Pletsch/Palmer method?  Besides using yourself as a pincushion is there any drawbacks to this method….it seems almost foolproof and you don’t need to make muslins!

Frozen Movie Inspired Nail Art

DSC_3646

I know I am on a Frozen kick. My daughter and I love this movie, the art work, sound track, characters etc. Too Cute.

So I have been thinking about this color scheme for a while. I have a lot of blue nail polishes but to get the hue just right I had to resort to foils and glitters as well 🙂

The snowflakes are from stamps Bundle Monster plate 319, and 323

I used Gelish nail polish “up in the Blue” and various glitter colors on top with chunky glitter pieces. I top-coated all these in place then did the stamps on top with another layer of top coat to seal in that last design element. The accent nail was foiled with “wedgewood” foil from Dollarnailart.com (this is where I got the glitter too 🙂

Here are a few pics. What do you think does it look wintery?

IMG_0333 IMG_0330

DSC_3640

Craftsy Baking and More Cookie Fun

I have signed up to a few pastry courses through Craftsy.com

This teacher is amazing and gives you the whys for certain techniques.  I love to know the whys!! I was that kind of kid…but why? Why? lol Check out her two courses here and here. Thank you Colette Christian 🙂

I took some pics of the pear tart I made, that is a recipe in the french pastry course. What do you guys think?

DSC_3356 DSC_3358 DSC_3359

The pears are cooked in red wine with various spices. It smelled amazing in my house. The custard it is baked in is an almond cream. Yum!

Ok onto a few cute pics from my cookie decorating obsession I have lately. lol

DSC_3511 DSC_3516 DSC_3518


Did anyone else sign up for Craftsy courses in their black friday sale? I bought a few sewing courses as well. Sigh….so much to learn such little time.

Have a great weekend everyone!